
Check your mobile phone!
When you receive the confirmation text, follow the instructions to receive your coupon code!
Maintaining Skateboard Trucks: A Guide to Keep You Grinding
Skateboard trucks are the longest lasting component on your skateboard and can last several years depending on how much grinding you do or how much impact you put on them. Many skaters like riding the same trucks for as long as possible because getting used to new trucks can take a while and can change the way the board rides and how certain tricks feel. In most cases, you can replace only the parts you need in order to keep skating the same set of trucks for a long time, or refresh your trucks with a full truck rebuild kit.
Here’s what we’ll cover:
- How to Replace Skateboard Truck Bushings
- How to Replace Skateboard Truck Kingpins
- How to Rethread Skateboard Truck Axles
- How to Replace Skateboard Truck Pivot Cups
When & How To Replace Bushings
Bushings commonly get worn out over time and start making your trucks floppy and unstable, which can cause you to get a lot of wheelbite. If your bushings are split or crushed on one or both sides, it’s probably worth replacing your bushings so you can get some more responsive turns and less flop.
It’s best to get the replacement bushings that are the same brand as the trucks you are riding because they are specifically designed to fit the geometry of that truck. Some brands like Bones and Shorty’s make bushings that will fit into several different brands of trucks.
How to Replace Bushings
Here's a step-by-step guide on how to replace the bushings on your skateboard trucks:
-
Use a ½ inch wrench or a skate tool to remove the kingpin nut. Unscrew it counterclockwise until it comes off completely.
-
Remove the old top washer and bushing from the kingpin. Slide them off and set them aside.
-
Take off the hangar by pulling it off the kingpin. Keep it aside with the old top washer and bushing.
-
Now, remove the old bottom bushing and washer from the kingpin. Set them aside with the other removed components.
-
Take your new washers and bushings. Remember, the thicker bushing should go on the bottom.
-
Slide the hangar back onto the kingpin and position it into the pivot area.
-
Place the smaller bushing on top of the hangar, followed by the new top washer. If the old washers are in good condition, you can reuse them. However, if they are damaged or deformed, it's best to replace them with the new ones.
-
Thread the kingpin nut onto the kingpin, starting it by hand. Tighten it to your desired level of tightness using the ½ inch wrench or skate tool. Be sure not to overtighten, as this can restrict the movement of the trucks.
-
Once everything is securely in place, your bushing replacement is complete.
Keep in mind that it may take some time for the new bushings to break in. Initially, your trucks might feel squeaky and exhibit some auto-turn. However, after a few skate sessions, they should become smoother and more responsive. By following these steps, you'll be able to replace the bushings on your skateboard trucks and ensure optimal performance during your skate sessions.
When & How to Replace Kingpins
The kingpin is a vital component of skateboard trucks as it serves as the large bolt that holds everything together. After enduring the extensive abuse of skateboarding, kingpins can become worn down or break. If your kingpin snaps or the threads are excessively ground down, making it impossible to secure the kingpin nut, it's time for a replacement.
When replacing a kingpin, it's recommended to stick with the same brand to ensure proper compatibility and fit. Additionally, it's crucial to select the correct length of the kingpin. If you have regular-height trucks, opt for a regular kingpin that is long enough to extend entirely through the truck. Using a low kingpin on regular-height trucks will result in insufficient length, while a regular kingpin on low trucks will protrude too much and potentially catch on grinding surfaces.
By being aware of the condition of your kingpin and knowing when to replace it, you can maintain the integrity and performance of your skateboard trucks. Ensuring you choose the right brand and length of kingpin will further enhance your riding experience and prevent any interference or complications while skateboarding.
How to Replace Kingpins
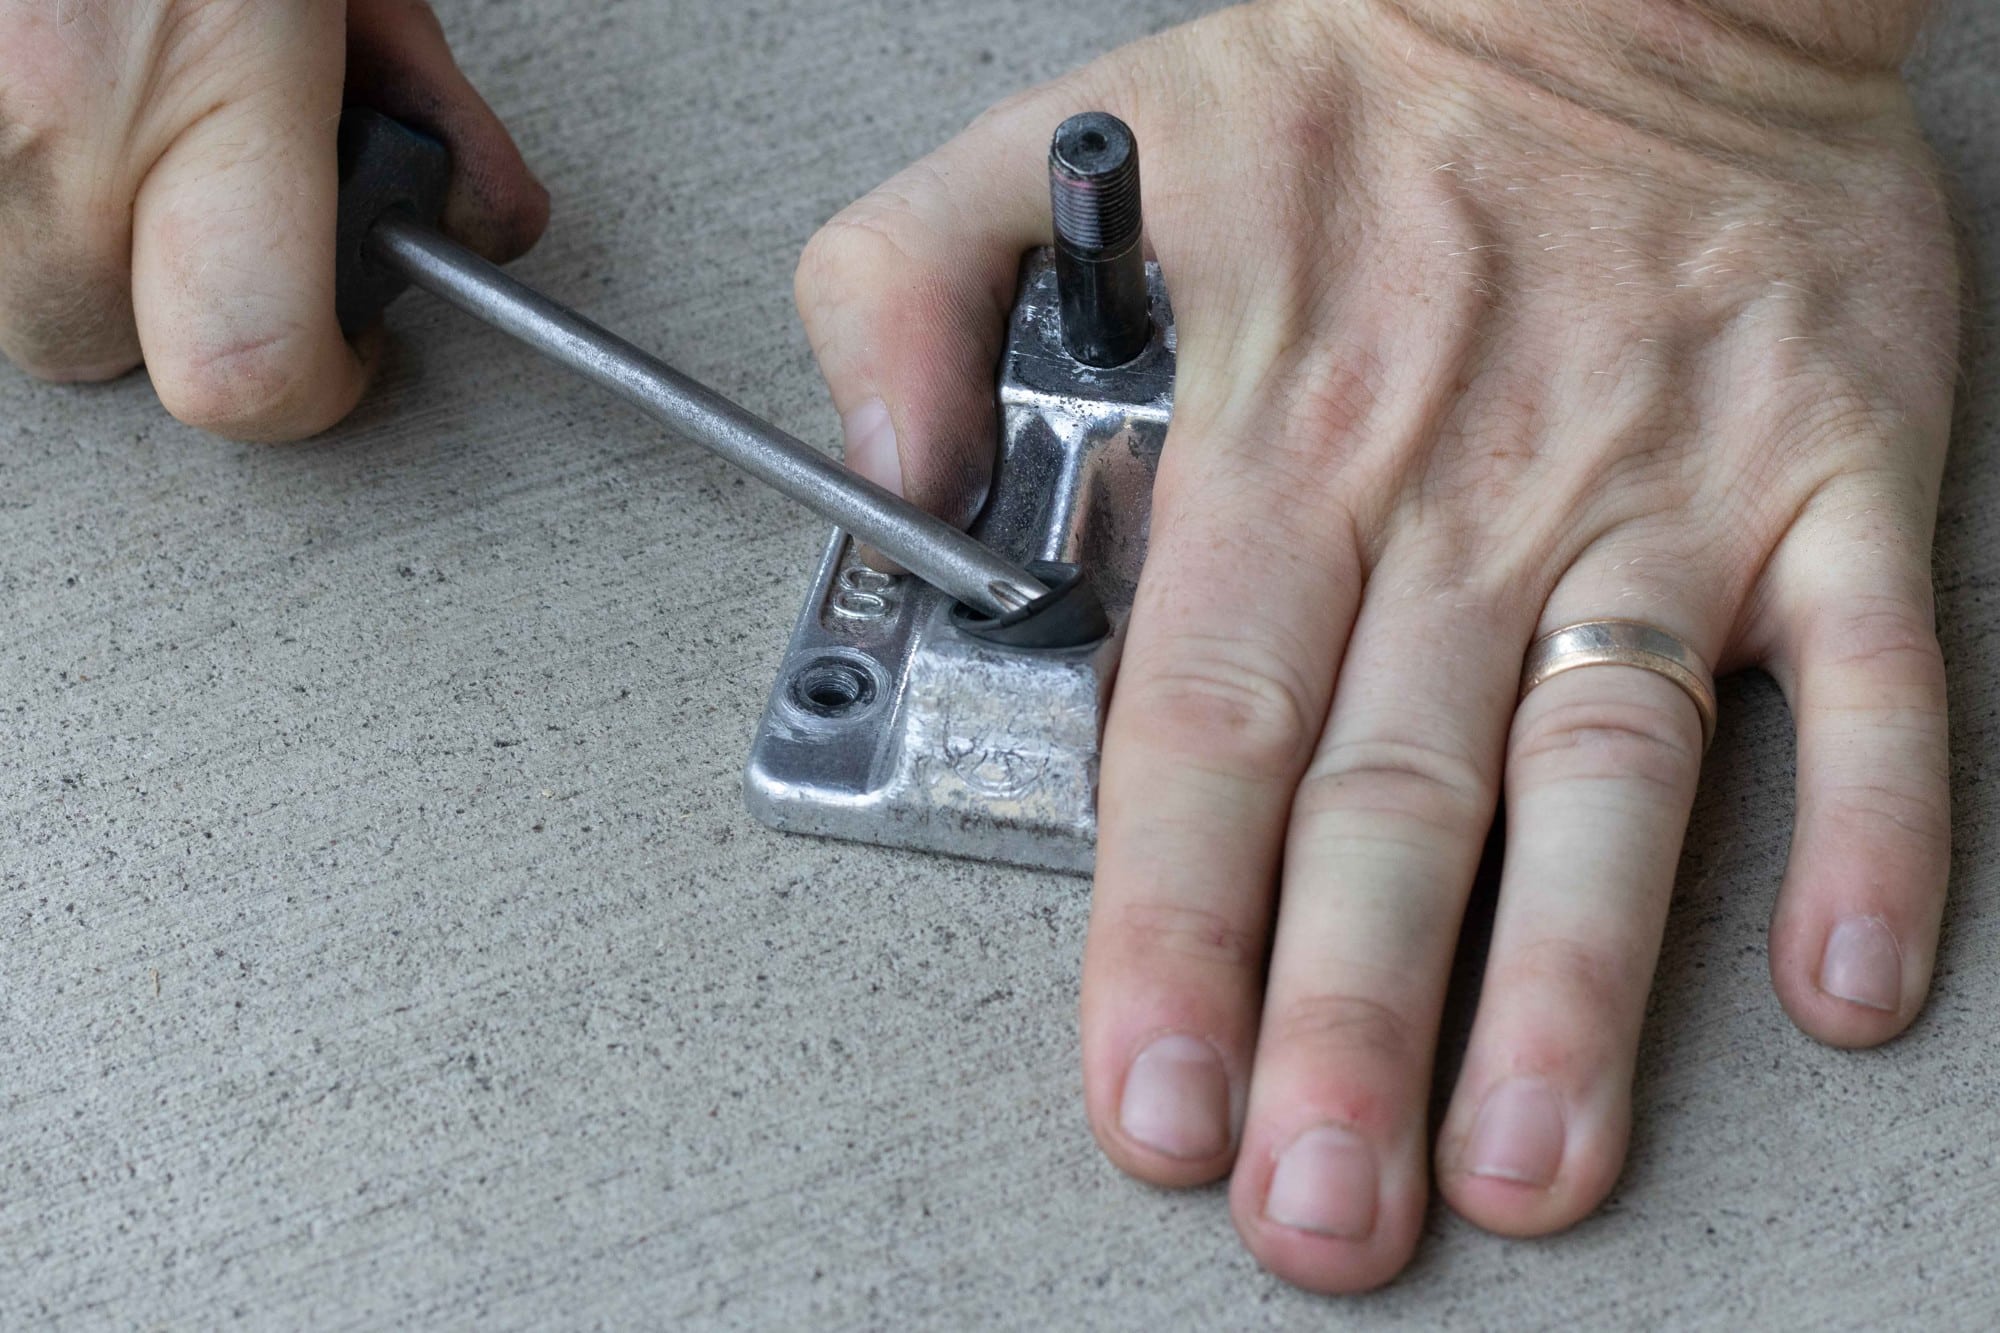
Step 1. Removing the Kingpin:
- Disassemble your trucks until only the baseplate and kingpin are left.
- Position the kingpin side near you and the pivot cup on the far side, allowing for a comfortable swinging angle.
- Using a hammer and a narrow, sturdy metal object like a bolt, strike the end of the kingpin directly. Deliver a few firm and direct hits to loosen it.
- After a few strikes, the kingpin should come loose, making it easy to remove.
Step 2. Installing the New Kingpins:
- Flip the baseplate over and insert the new kingpin. Rotate it from the underside to ensure that the splines (grooves) are properly aligned. Correct alignment is crucial for a smooth installation.
- Adjust the new kingpin until the splines are properly lined up, ensuring a hassle-free installation. Apply gentle pressure to set it in place.
- Create a bridge using two pieces of wood and place the baseplate across them. Let the new kingpin hang down between the pieces of wood.
- Hold the baseplate steady and, using the same technique as before, hammer in the new kingpin.
- It may require some force, but a few well-aimed strikes should be sufficient. Make sure the kingpin is fully inserted and sits flush with the baseplate.
- Once the new kingpin is securely in place, reassemble your truck by putting the remaining components back together.
By following these steps, you can confidently replace the kingpins on your skateboard trucks. Remember to exercise caution when using a hammer, and ensure that the splines are aligned for a successful installation.
How to Rethread Axles
Knowing when to rethread your axles can save you from the frustration of dealing with damaged threads. Skating can take a toll on your skateboard, especially when you're landing flip tricks, encountering primo landings, or hitting gaps. Over time, the ends of your axles can become smashed or mushroomed, resulting in damaged threads that make it difficult to remove and reinstall axle nuts.
Follow these steps to rethread your axles and restore smooth functionality:
-
Prepare for Rethreading:
- Start by removing the axle nut and wheel from the affected axle.
-
Apply the Die Tool:
- Place the die tool on the end of the axle.
- Ensure that the die is positioned flat and perpendicular to the axle before starting the rethreading process.
-
Rethread the Axle:
- Twist the die while keeping it completely flat to avoid cutting new threads that are misaligned with the original ones.
- Maintain a steady grip and slowly turn the die clockwise. You will feel resistance as the die cuts through the metal filings that obstruct the threads.
- Once the die reaches the original threads, the resistance will decrease. Stop turning the die at this point.
-
Check Your Work:
- Remove the die tool and inspect the threaded ends of the axle. They should appear cleaner and more functional.
- Perform a quick check to ensure that the axle nut can easily catch the threads.
-
Final Steps:
- If the nut goes on smoothly, proceed to put your wheels back on.
- Now, you're ready to hit the skatepark or the streets with your rethreaded axles.
By following these steps, you can effectively rethread your axles, eliminating the hassle of dealing with damaged threads. Enjoy a smoother experience when removing and reinstalling axle nuts, and get back to skating without interruptions.
Skateboard Truck Pivot Cups
Knowing when to replace pivot cups is crucial for maintaining optimal performance in your skateboard trucks. Over time, pivot cups can wear out, leading to issues such as the pivot popping out or a loose, rattling feeling. If you experience these problems, it's likely a sign of loose trucks and a blown-out pivot cup, indicating the need for replacement. To replace pivot cups, follow these simple steps:
-
Identify the Need for Replacement:
- If your pivot pops out or your trucks feel excessively loose and rattly, it's time to replace the pivot cups.
-
Gather the Required Tools:
- You'll need a screwdriver to pry out the old pivot cup and a new pivot cup for replacement.
-
Remove the Old Pivot Cup:
- Using a screwdriver, gently pry out the old pivot cup from the truck baseplate. Apply even pressure around the cup to avoid damaging the baseplate.
-
Insert the New Pivot Cup:
- Take the new pivot cup and align it with the hole in the baseplate. Make sure it fits securely and snugly into place
Keep Learning
Still Have Questions?
If you still need more information, rest assured that we have the resources to help you out. Our customer service team is highly knowledgeable and can answer any questions you may have about skateboard equipment. You can easily reach out to them by phone or message.
Additionally, if you are in Portland, Eugene, or Bend, feel free to visit one of our local shops and speak to one of our friendly and helpful retail employees. They'll be more than happy to assist you and provide any information or guidance you need. Don't hesitate to reach out to us - we're here to help!
Customer Service:
Call us toll-free at 888.450.5060
Text us at: 888.450.5060
Monday - Friday, 8 a.m. - 6 p.m. Pacific Time
Saturday - Sunday, 9 a.m. - 5 p.m. Pacific Time
If